First off, I'm using this tileset, which I got from spicypixel.net. I did trim it up a little for use with DAME and flixel, namely using paint.NET to cut out the magenta background and leave it transparent instead.
Also, there's a lot of unused space in the image. I could have trimmed it out. I probably should have, really. But it's not going to hurt anything, so I left it in.
This time, I tell DAME to make a level that's 100 tiles wide by 50 tall. That should give plenty of room to run around in. To speed up the drawing process, DAME has a nifty feature called the tile matrix. Basically, this lets you paint on the map, and it will choose the correct tiles to use based on what neighbors are around. Let's take a look.
Here it is. You can drag tiles from the palette onto the matrix to make a nice shape, like I've done here. Strictly speaking, you only need a 3 x 3 matrix. The reason I went with 5 x 5 is so that I can put more variation in the center tiles. DAME will randomly choose tiles from the mix to fill in space, so long as 'Randomize middle tiles' is checked off.
If I want to be even fancier, I can select 'Allow special tile connections' and make more rules for how tiles fit together. There's a bunch of custom rules already available that you can drag tiles to. If you don't drag a tile into a spot, that rule gets ignored, so you only need to fill the spots you actually have art for.
See those red and green dots around the tile the mouse is pointing at? That's how you define the rules. It will use that tile if there are filled tiles in all of the green directions, and empty tiles in all the red directions, and it doesn't care about the blank directions. It sounds a little complicated, but just go ahead and experiment with it. You can always manually adjust the final result, anyway.
Once you've defined your rules, just minimize the tile matrix rules window to get it out of the way, and start painting. I still don't have any real vision for the level, so I'm just going to draw an uneven floor and a bunch of platforms.
I find it's easiest to draw big blocks, and then use right-click to carve those blocks into more interesting shapes.
If you want to keep your previous map, be sure to rename the old .csv file before you export the new one, or it will overwrite it. Which is totally what I just did. Oh, well, didn't want to save the old one, anyway.
Make sure the map and the new tileset are in the right folders, and that PlayState.as is aware of them.
[Embed(source = '../../../../levels/mapCSV_Group1_Map1.csv', mimeType = 'application/octet-stream')]public var levelMap:Class;
 //[Embed(source = '../../../../art/tilemap.png')]public var levelTiles:Class; // This was the old art, not using it anymore.
 [Embed(source = '../../../../art/area02_level_tiles2.png')]public var levelTiles:Class; // This is the new art.
Mash go to test the file, and... I can see a little bit of the level as helmutguy goes falling out of view. I haven't set up any sort of camera instructions, so we're stuck with a fixed view of the top left corner of the game. Let's fix that. Right after we add the player, we set up the camera to follow helmutguy around, like so:
 add(player = new Player(10, 10));
 FlxG.follow(player,1); // Attach the camera to the player. The number is
 FlxG.followAdjust(0,0); // Adjust the camera speed with this
 FlxG.followBounds(0, 0, 1600, 800); //Keep the camera from scrolling past the map edges
And now the camera is working quite nicely. I can always adjust the exact numbers later until everything feels right.
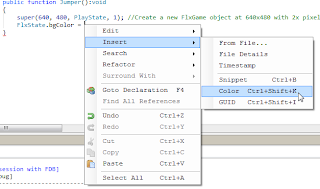
 Now I want to make things a little prettier. First off, that background is too bland. Let's change it from solid black to more of a grey. We have to go back to Jumper.as and add FlxState.bgColor = 0x########. (Actually, we can put this pretty much anywhere in the code. But I'm putting it here.) Conveniently, FlashDevelop has a shortcut. Just type everything except the color code, then right click and choose insert, then color, then pick what color you want. Flixel wants 8 digits in the color code, and FlashDevelop gives you 6, so just put FF at the front. The first two digits are the alpha channel; FF means fully opaque.
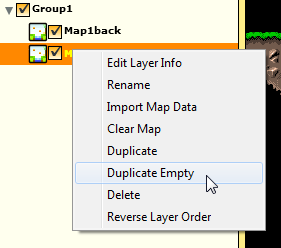
 Changing the color is nice, but it's still pretty monotonous. Let's add something to break it up a bit. Back in DAME, I add another layer to the map by right-clicking on the map layer and choosing duplicate empty. Now I can draw a new layer without messing up the old layer.
I make a new matrix, but just leave it simple this time. I just want to draw a bunch of shapes all over the map to be stuff in the background.
Just doodle right on top of the map, don't worry about overlapping. Make sure to get plenty of coverage. You can drag the names of the map layers up and down to change which one is displayed on top, so you can get an idea what it will look like.
Once we're done with that, export again. This time there will be two files. We have to add each one in separately. The regular level is already done, so we just need to add the background to PlayState.as. Make sure to embed it;
[Embed(source = '../../../../levels/mapCSV_Group1_Map1back.csv', mimeType = 'application/octet-stream')]public var backgroundMap:Class;

public var background:FlxTilemap = new FlxTilemap;
Then we need to display it. The order that you add things to flixel determines what is on top; things you add later are drawn on top. That means we want to draw the background first, so everything else will be on top of it. While we're at it, we can tweak how quickly it scrolls, to get a cheap parallax effect.
add(background.loadMap(new backgroundMap, levelTiles, 16, 16));
background.scrollFactor.x = background.scrollFactor.y = .5;
There we have it, a full sized level to roam around in. Now, helmutguy can't jump high enough to get everywhere, so either he needs to become more agile or the level needs to be designed better, but that's a job for later.
Here's the source so far, and here's the flash file: http://www.swfupload.com/view/144486.htm


I can't remember if I've commented on here already, so here goes. This is a GREAT resource. Thanks so much for putting this together!
ReplyDeleteThe flxG.follow... methods don't exist anymore in the latest versions of flixel (2.5+).
ReplyDeleteYou should use instead:
FlxG.camera.follow(player);
FlxG.worldBounds.x = 0 ;
FlxG.worldBounds.y = 0 ;
FlxG.worldBounds.width = 1600;
FlxG.worldBounds.height = 800;
@Stephane Wantiez Thanks!!!!
ReplyDeleteSo 4 years later you're the first person I found who explains the tile matrix feature. Thank you.
ReplyDeleteI also want to add that a matrix can be imported through the file menu if you want to carry over one from another project.
Delete